2026-03 Last Workmonth
Spring Sunlight
In the first week of March the sun started getting significant. I dug out the snow on the sun-facing side of the greenhouse to try and get more sun and heat into the greenhouse itself. I removed snow from the corners of the front driveway while the snow was soft. As the temperature gets warmer the snow will melt but then refreeze overnight, becoming hard ice until the temperature stays above zero, so it was a good time to try and move it all.
I tried to be clever by putting soot on the pathway, thinking the black surface would melt the snow and ice a lot faster. It seemed to make no difference but the soot-covered path looked awful for a couple of weeks. It was not my best idea.
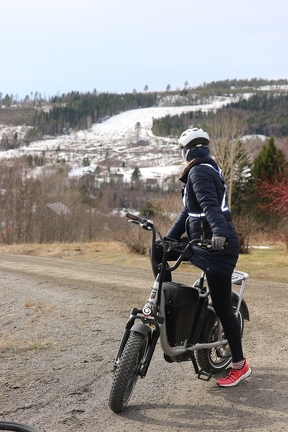
When the temperature has been above zero it’s been a good opportunity to start cycling again and we’ve done some short cycles just to get back into the habit
In the second week the solar power was getting significant and we were exporting so I set the battery to “normal” buying and selling mode instead of just acting as a power-cut device. It’s been colder this year and so we’ve purchased more electric during January and February which has caused high electric bills.
Workplace Goodbyes
In the third week of March I did my last client facing task for my company, and my last message was to say thanks for all the fish on the group chat.
Kommun Visit
The kommun (council) planning officers came to visit to talk about my query over what self-employed options I could run from our property. They were quite relaxed but said they’d have to go and check the exact wording of specific requirements.
For welding work, the biggest concern was needing ventilation in the garage. We also discussed likely setups involving welding curtains and if a catchment tank might be needed for the drain in the middle of the garage. I mentioned the planning restrictions on the plot and wanting to move all the gardening equipment out to its own shed one day, and the kommun officers stated there had been some changes in the past year or two to the rules and I would be able to have two smaller buildings on the plot.
For carpentry, ventilation in the basement was the main concern, this time due to dust. Fireproofing standards for the room also came up – it wouldnt be too hard to fit a rigid stonewool cladding to the roof to give some fire protection and sound isolation. They had no apparent issue with windows being added. They saw no immediate problem restoring a small access door that had been covered up about 20 years ago by a metal facade. Levelling the floor wasn’t a problem.
For plant growing, this was more in the hands of other government departments, and they gave me the names of two departments to approach.
Jobs + SFI
I sent out a job application for summer work to a local company and got a rejection back as they were already full. Not unexpected but it’s been a long time since I got job rejections and I need to get my brain used to it because the job market is tough at the moment and there will be lots. I did other tasks for the next day or two. I’ve got a few other vacancies to apply to.
In the meantime I contacted SFI (Swedish for Immigrants) which is a group based language learning program run by the Swedish government in each region, to help integrate immigrants. I haven’t done SFI earlier because the standard course runs during the day (although this has improved over the last few years), when I would normally be working. But I had done a term of a similar distance evening course with Folkuniversitiet. Anyway, now was a great time to get some study hours in to improve my Swedish.
I went for an interview the day I applied, and the assessor assigned me to the SFI B class (approximately CEFR A2) which is what I expected, starting in early April. It gives me access to 3 hours a day, 5 days a week, of tutor-led Swedish classes for free. 3 hours a day of in-person study for any subject is significant over time.
Old Furnace Chimney
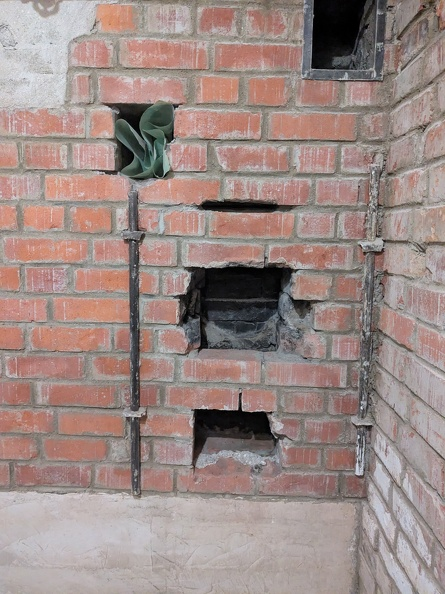
I’m continuing to work in the basement, restoring an old basement furnace room. The below photo shows the old furnace brickwork in the basement before my fixes. The clean air ventilation hole is at the top right, and I believe this has its own chimeny line up to the roof. The soot clearout is the opening to the left, and it’s less clear where it leads. The original fireplace opening is at the very bottom, which likely had a metal woodburner stove feeding into it. The “slot” is for a metal sheet to fit into as a dampener, sealing off airflow in the chimeny when not in use. It’s currently missing so I will have to get one of the right size. Lastly, the damaged area is in the middle which would have been smashed out when the floor level was raised and an oil burner added, perhaps in the 1960s. All the iron doors and similar for the various openings are long since lost.
I bricked up the 1960’s modification. For this I used a high temperature ready-mix mortar, called “Eldfast”, and a few spare bricks. I wetted the brickwork first so that the mortar wouldn’t get dried out by the bricks before it had time to react and set. The mortar was easy to mix up and work with. I was able to get my arm up inside the flue and smooth off the mortar on the other side os as not to accidentally clog the chimeny nor leave the brickwork unprotected. It was grubby work inside the chimney.

The old oil-burner soot created a mobile stain that came through the water based white paint. It’s visible as a grubby halo around the repair area. I will revisit this later but for now I’ll give everything a chance to harden and set before worrying about it.
Chimney Clear
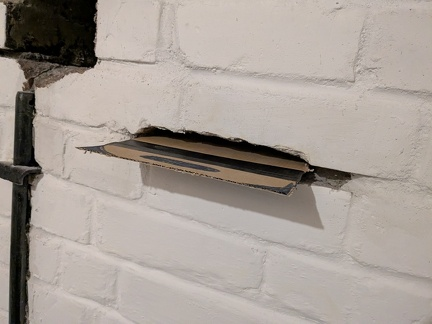
I’d had a problem with the old chimney and ventilation lines in the brick chimney stack being blocked by things that birds have dropped down the chimney. I ordered a cheap 4-metre brush kit, just as an emergency declogging kit. When it arrived I used the line to sweep the chimney, soot clearout line, and ventilation line in the basement.
I started with the soot clearout line. You know it’s going to be satisfying when there is a soft “thump” of massive amouts of soot falling, and a rolling cloud of soot slowly comes out of the opening. In the end I removed another large bucket (about 25L) of soot. I can see airflow going through the soot clearout now.
The main core chimney was quite clean. But the clean air ventilation line was full of branches and twigs, and bits of paper litter the birds had dropped. I removed another 4-5 buckets of branches and twigs from the ventilation line.
Proper Chimney Sweep Visit
The chimney sweep came, swept the ground floor chimney, took a short look downstairs, and then headed off. I’m glad he came and it is a legal requirement for it to be swept, but I was really wanting him to prove the airway channels were clear and maybe use a camera to see where the bricks had fallen from. But that didn’t happen – sometimes people have a specific workflow and a limit to what they do.
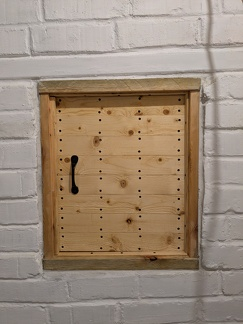
Hatchway Door Creation
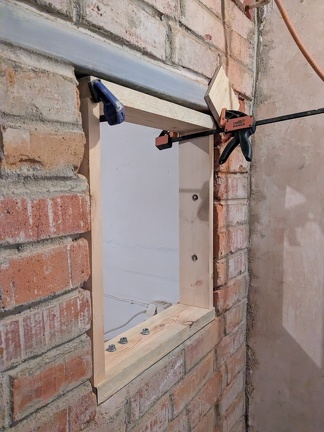
The basement old heater room originally had a small hatch, probably to feed wood from the main room next door to the furnace room. Last month I’d opened up the bricked-over hatch, fitted a metal lintel, and replaced some cracked bricks.
This month I built a basic frame from spare wood I had in the workshop. I fitted long metal masonary threads into the brickwork either side and created a small recessed area for the nut. The first time I carefully measured the nut and made the hole the right size to accept it. I realised this was a mistake as soon as I tried to tighten the nuts up with a socket, because the socket needs room to fit on as well. I recut the holes and tried again which went fine, but I didnt tighten it all up just yet. I held the frame in the right orinatation with clamps and then fed mortar in around the framework until mortar started to fall out the other side of the wall, and then went round the other side to finish filling it and make things neat.
I build a door using spare 120mm construction wood. I cut 4 lengths slightly bigger than the opening and then used wood glue along the edges to join them together. I used clamps to press them together as they glued, and clamps to hold them to a flat surface so the pieces were aligned.
The hard part is resisting the temptation to open the clamps afer a couple of hours. Waiting until the next day gave everything more time to set. I fed the finished assembly through a tablesaw to cut the four sides to fit the doorway. I then used a handplane to go over the face to try to flatten it. I did a dry-run of fitting it in the doorway. In the future I need flatten it some more, fit an intumescent dust deal around the edges. I also need to find door hinges, door handle and a door lock that matches the room.
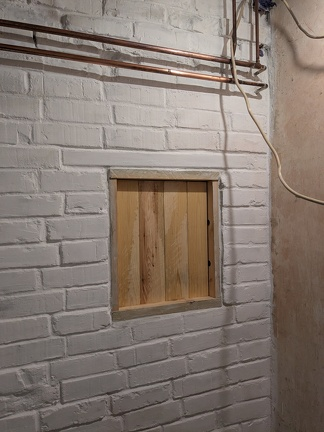
I then received instructions that the door was to match the cold cellar door, which uses horizontal wood with nails. I used the table saw to make wood strips of the same width as that used on the food cellar door. I then glued it together as a layer. To get the drilling pattern for fixings uniform I made a small wooden jig and used it as a drill guide for pilot holes. I then glued the two layers together. Later I sprayed it with a wood oil spray which made it more golden like the food cellar door.
This project ended up a bit a bit imperfect but it’s done. Due to inexperience with making doors, the seal is not great and the horizontal slats are slightly off in alignment compared to the opening. I can always improve it in a revisit, maybe in 5 years.
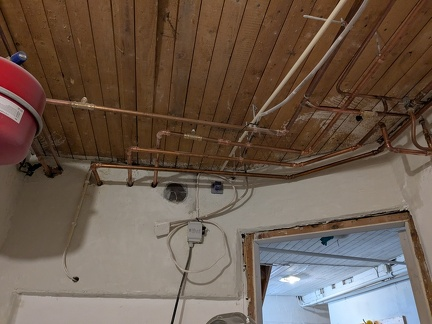
Pipework
I spent an hour or two up a ladder removing the old oil soot that was caked-on to the old copper pipework. It’s easy to remove the gunk from most of the pipe but it’s all the bends and fittings that are difficult to clean. A small polisher would be ideal but I dont have one right now. It’s starting to look pretty though, like the pipework in a brewery.
I came back to this and tried emery paper on the worse parts, and Barkeepers Friend (which looks and smells suspiciously like citric acid and baking soda) on the general dirt.
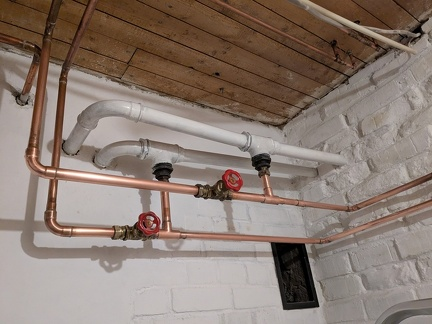
I painted the steel pipework with Hammerite smooth white, which is a difficult paint to use as it needs frequent stirring to stop the pain separating out and it goes unworkable and tacky quite quick, whilst being prone to runs and drips. It also had strong fumes that travelled throughout the house. I wont do a second layer until it’s warm enough outside to allow the house windows to stay open.
Flue Dampener
I made a cardboard cutout of a flue dampener that I need to replace the missing one in the old fireplace. It’s a metal sheet with a handle that would close off the flue when not in use. I wrote the sizes on the cardboard cutout and sent a photo to the engineering place near me to ask for some metal sheet. I was able to pick it up the same week and it slides straight in to seal off the flue.
Walls
I did more flattening of the concrete walls, sanding, painting and then repeating here and there. This took a while but by the end of the month I think it’s done. Just the ceiling to fix, floor to lay, and some missing fireplace ironwork to fit.
Other
I got the cheapest welding table I could find anywhere. It’s delivered and I need to build it.
At the end of this month, our local hardware shop annonced that they were closing, after decades of running, it’s going to be a big shock
I asked the neighbour for permission to modify the wooden bridge from our property to the main town path, which they were fine with. I’ll do that next month when it’s warmer outdoors.
There’s at least 3 other situations I cant write about; it has been a wild month.
