2025-12 – Heating Room Digout
The month started with snow like normal but became the warmest December we’ve seen here. After the first week all the snow melted. A little ice remained but temperatures went above zero. The lack of snow is a problem for the community because it means there might not be the right conditions for winter sports such as the ski slopes and snowmobiles in January and February.

Putting Up French Cleats
It’s hard finding a place for everything and I wanted to give more storage space in the garage. To maximise storage on the walls I wanted to put up a French cleat system.
I ordered some 18mm plywood from the local hardware shop, as they deliver it to my house. I appreciate this as it comes in massive sheets.
I used a spider table and tracksaw to cut the plywood into 7cm wide strips, with a 45 degree cut on one edge. Ideally I’d have a tablesaw with outfeed tables so I could use all the material. With the tracksaw and table I didnt have a stable surface to finish the entire sheet, as it gets harder to keep the sheet stable as it gets thinner.
I then used a cheap laser level to line the lengths up on the garage wall and mount them. It’s important to screw them into the wooden wall studs that make up the structure of the walls, so that the cleats are strongly held. Where this wasn’t possible it’s necessary to mark and add a wall plug in the gypsum board surface.
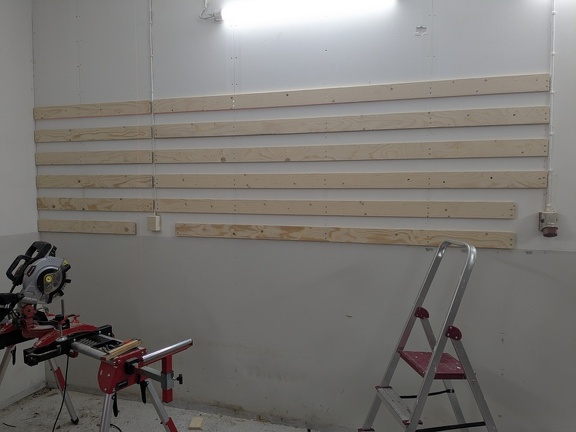
I remounted the existing wall cabinets in the room onto the new system. I will need to create cleat hangers for all the various things I want to hang, which will take a while. That’s a project for another month due to weather pressures relating to another project, described next.
Digging out the old heating room
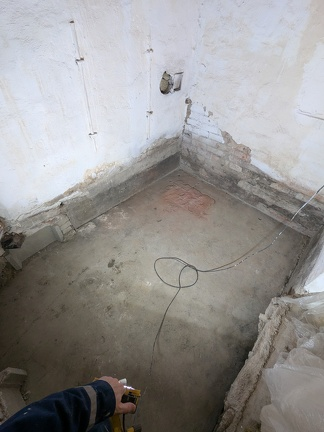
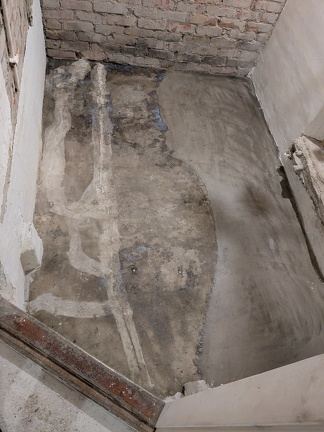
In the basement is a room, previously used as the boiler/heating room for the house. The house uses a ground source heat pump nowadays but was at one point using a oil burner, fed from a big oil tank. I wanted to make this room clean and usable, perhaps as a food pantry.
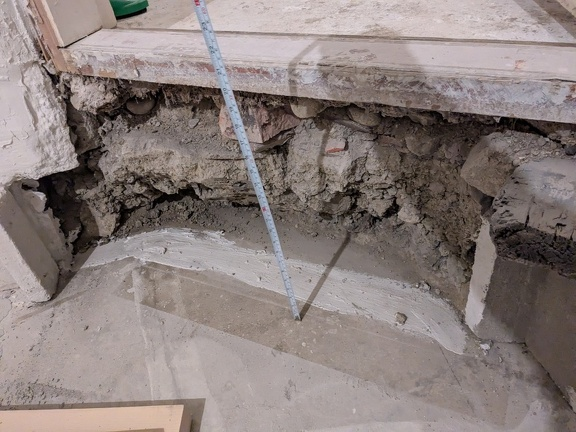
I hired someone to help me for a day, lifting buckets of earth out of the basement. I also hired a skip which was a lot bigger in size than I expected. I got to shovelling and filling buckets and my helper took them up the stairs and outside to dump them in the skip. It felt like it took a long time but it was uplifting when we started to make visible progress.
Specifically, there was a nice surprise that changed the project. I had worked out how far I would have to dig down, accounting for the difference thicknesses of insulation and flooring I wanted to add in. I worked out that I needed to go down slightly further, about another bricks depth, than was currently dug. As I dug down, the shovel hit a long flat hard surface. The more I cleared, the more I realised with happy excitement that it was a flat concrete floor underneath all the rubble. This was a big surprise. It was about the same depth as the nearby basement workshop floor and I hadn’t encountered big cracks.

I think the entire house was laid on one flat concrete slab in 1941. Some period later (perhaps the 1960s) an owner wanted to have a floor drain. For this they infilled half the basement about 400mm using bricks and earth with the drainage pipes laid in it. They then added a thin concrete layer as the new floor surface. This meant that a major part of the basement could be used as a laundry room. I think they decided to do the heating room floor at the same time because it wasn’t much additional effort and kept the floor heights the same.
On day 2 we finished clearing the last of the infill. I contacted the skip hire company to get the skip removed as we were expecting deep snow. The snow clearing vehicle would need to be able to manoeuvre in the driveway, which was currently occupied by the skip. The floor was now clear and this task was complete.
Working on the walls
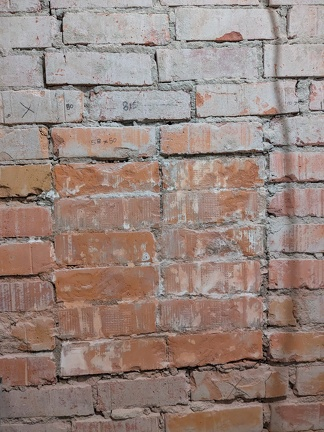
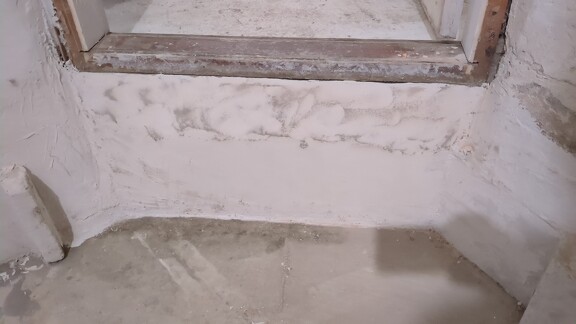
Two of the interior walls were brickwork covered by thick uneven cement render. As the heating room had had an oil burner in it for some years, the render had been soaked in oil heater soot. I decided to chip away at it and within a short space of time I had about half the wall uncovered.
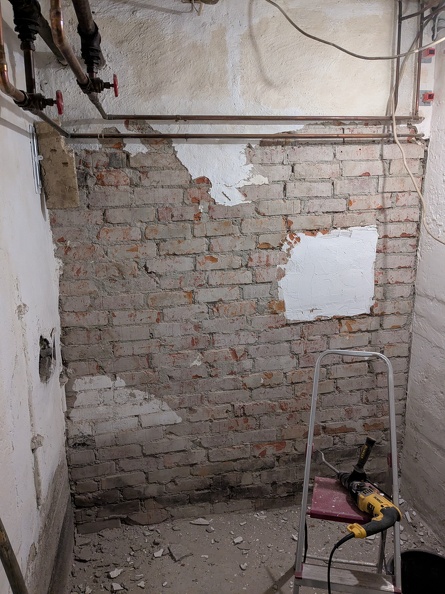
One wall is made up of the brickwork of the central chimney stack, and the brickwork is fairly consistent. The wall to the north divides the workshop and the heating room. The brickwork on this later wall annoys me:
- The bricks are out of alignment across the face of the wall, such that some bricks stick out.
- The entire wall is not plumb from top to bottom.
- ‘The mortar thickness in each row is visibly inconsistent, leading to the next item:
- The brick rows bend upwards from left to right, more and more over a sequence of rows. At their worst, pointing a laser level at the brickwork shows a 2m line of bricks varying across the row by the height of a brick.
- There’s a square for a inspection hatch, now bricked in, but there’s no lintel above the opening.
- The wall is only tied in at one end, to the brickwork of the chimney stack. The other end meets the cast concrete basement perimeter wall. There are no metal ties or similar visible behind the mortar that’s come loose from the joint so far.
The discrepancies aren’t due to settlement: the floor itself is only 2cm out of level. As this is a wooden house, the brick chimney is the only significantly heavy object above ground level. It looks like the brickwork was laid by someone inexperienced or in a rush, who knew the wall would be rendered over.
I thought a lot about how to finish this wall. I want to make the house better whenever I can, but also keep to the character of the property, but I cant justify wasting a months wage on fixing a slightly wonky wall that has stood for 80 years without issue.
I don’t think I could justify the cost in knocking it down and rebuilding it. I estimate it to be about 340 bricks. If I was retired I’d remove the mortar and dismantle it, preserving the bricks. I think that with a guide, a laser level, and some significant care I could lay a better wall. But I cant justify the time and disruption investment of doing it myself right now, nor the cost of getting someone else to redo it.
I can repoint the wall cheaply. This involves a special rotary bit for the grinder that will reduce the risk of damaging the bricks. It will also keep the wall strong. I can limewash the wall or possibly apply a lime render which would be a good material for the basement and in fitting with the character. I need to be careful I communicate effectively with the local building supply centres to get the right type of lime. It comes in different application types and hardness. I want the softer form, as I need to avoid using any renders that are harder than the bricks themselves and it wont be exposed to the elements.
Floor Levelling
I did think about putting down a layer of insulation and then a full 100-150mm slab but it was going to mean a considerable lot more work and expense for little benefit. I thought I would instead use the existing concrete slab, but repair the minor cracks and then level it.
Self levelling concrete is more expensive than normal concrete per bag, but would mean a level floor at less overall expense and less overall effort, plus more ceiling height. I’ve applied it in a couple of projects already, and so had some confidence and experience in what I could expect.
I used a grinder to clear out cracks and filled them with hard repair cement. I also used a grinder to cut off and reduce two metal threads coming out of the floor which would have been used for some sort of machinery placement long ago. I vacuumed and mopped the floor to remove dust to help a layer of self-levelling concrete adhere to the existing concrete.
One of the local hardware shops had a pack of the plastic floor deviation measurement plastic tabs, which was fantastic. I measured the deviation of the floor height using a laser level the measuring tabs. The floor was about 32mm out, which was noticeable.
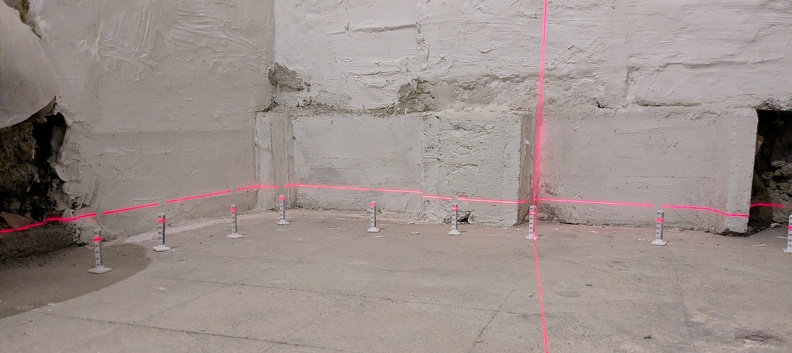
The local shop only had two bags of self levelling concrete in stock, so I mixed and laid those in the worst section of floor. From previous experience I worked it as little as possible. I got the mix pushed into the relevant corner areas with a trowel, smeared the surface to a consistent colour where the two buckets of material had met, and then resisted all urge to play with it more. I just let it set.
This now gives a reduced deviation of 10mm across the entire pad. I’ve some more self-levelling mix on order which I can finish the floor off with when it arrives. I was confident that this was going to be a good floor.
Oh Great, Asbestos
Above the gypsum roof of the heating room is a layer of asbestos cement board. I’ve asked a professional asbestos removal company to come in and remove it, which will happen next month.
The boards are in good condition and not any danger as long as we dont poke or drill it. But there’s always the risk a workman will drill into it despite being warned of it. Already I see the plumber put holes in it in previous work. So I’d rather it was out of the house to reduce ongoing risk
Until then I’m avoiding work above head height in this room.
Hatchway
In one wall is a bricked up hatchway to the adjacent room. I suspect it was used to pass firewood into the wood fired boiler room. Wood likely was delivered into the basement through from the external delivery doorway in the adjacent room. I’d quite like to reinstate this hatch for a few reasons.
- I like keeping or reinstating the original building features.
- Most of the work is already done, so it would be an interesting project to learn from, by building on my existing skills and learning some new ones.
- It would be a cheap project.
- It doesn’t devalue the property.
- Whilst it’s not wide enough to count as a fire escape for legal purposes (I think the requirement is 1m x 1m) it would give the heating room and the workshop an unofficial alternative method of escape in the event of a problem like a sudden fire.
I think the right way to do this will be to use a strong metal lintel and frame to give the brickwork above some support, and then a metal door each side, with the ability to lock from the heating room. There are two broken bricks visible, but none others over the face of the wall, and they should be easy to replace.
Fireplace
In the heating room there used to be an oil burner. It had a soot sweeping hatch and there was also a separate fresh air vent. Removing the cement render revealed that this was not the original layout. Likely there was a wood-fired water heater in the original 1941 house, which would have used the now bricked-up opening visible as different coloured brickwork at the bottom of the following photo:
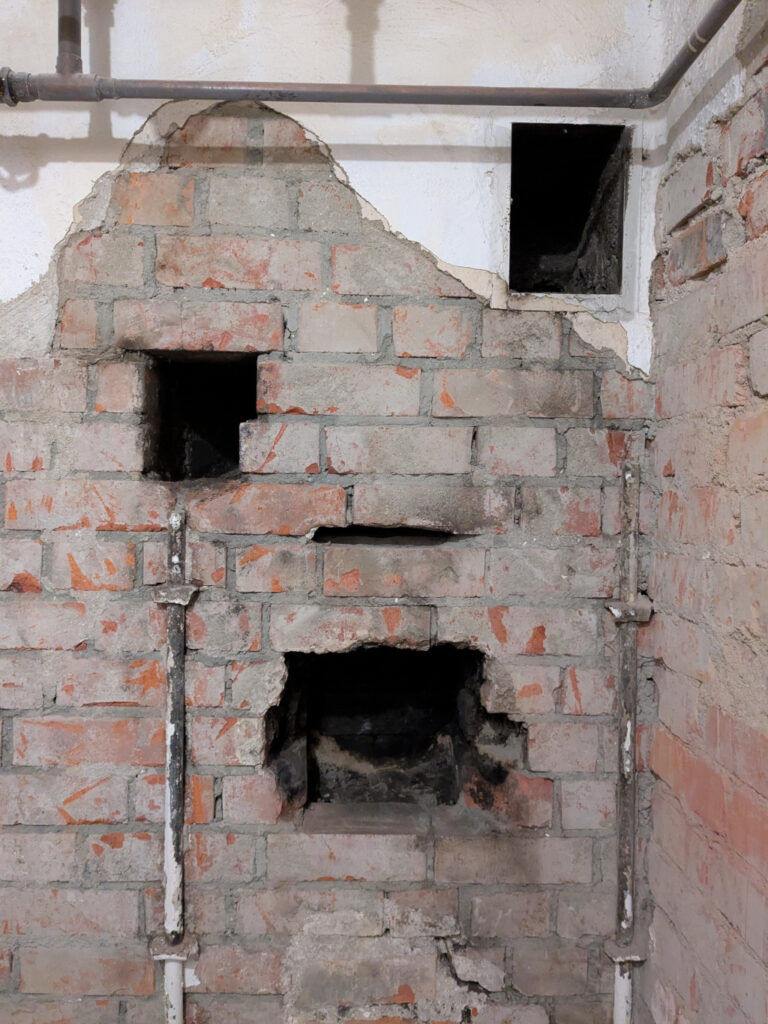
Removing the render revealed the repointed cement that sealed up a flue damping plate insert, and the original hole for the chimney. These had been filled in and a new hole made for the oil burner. As the oil burner had not been used in decades, and hence this section of chimney not regularly inspected and cleaned, I found some problems.
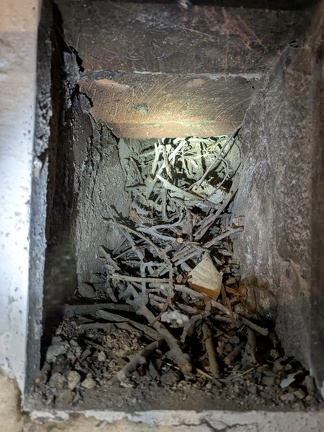
The fresh air vent was blocked with twigs and branches: I pulled out a bucket or two but couldn’t reach the ones further up. Some air flows through this but it’s not as much of a flow as it should be.
The chimney flue was also blocked with branches. I cleared buckets full but couldn’t reach ones higher up. There’s no air flowing through this route which is a bad sign and it will need sweeping.
The clear out vent was blocked with soot. I removed an entire bucked of soot but still air does not flow through this section. I put an inspection camera up the vent and it knocked loose a wall of soot. It needs a sweep out.
A simple ebay cleaning kit is not going to handle the branches and similar so I’ve asked a chimney sweep to visit.
The occasional brick has come down too, from somewhere within the chimney, so I’ve also asked for a camera inspection during the sweep.
Door Threshold
Because the door to the heating room was set in the raised floor, there was no support underneath it once the rubble and earth was removed. So I cleaned the slab beneath and set about casting a concrete plinth to support the doorway and to define the corner of the room.
This took about 120kg of concrete in the end, laying over a period of about 4 days because casting vertically was a little tricky. I used a wooden plywood board and wooden supports to create a cast which allowed for a lot of the material to be set at once.
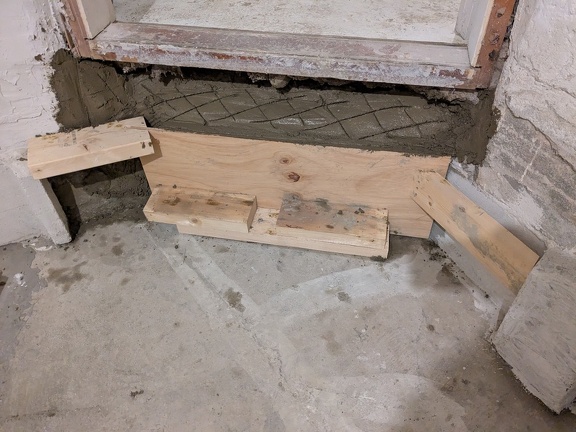
I smoothed it all off with fine repair concrete to make it look more like the concrete on the external walls of the basement.
I think this is strong enough to transfer any weight to the slab below. If I lived elsewhere in the world and wanted it to be stronger in terms of being part of a reinforced storm shelter or similar, I could have drilled into the adjacent walls and the slab below and epoxied rebar in. That way the rebar would tie the new and old concrete together.
Fixing the red car
The red car went in to have an engine warmer fitted, so we can now plug it in at car parks during the winter.
It also got the cam belt changed and the water pump replaced, which is great for peace of mind. There’s no outstanding preventative maintenance on this car now.
Visit to Ö-vik
We visited the large town to the north for a few things, including pet supplies for a cat. We’re thinking in the new year it might be time for a pet.

We also had our first sighting of the new 34.5m long lorry standard on the roads. It was a Postnord (like UK Royal Mail) lorry, pulling two trailers.

Windstorm
A heavy wind storm (Storm Johannes) hit Sweden and we got the emergency text message to avoid driving. We didn’t have any power interruptions and haven’t noticed any property damage. We only have one large tree on the property.
The house does audibly “rack” when the wind blows hard. It’s hard to improve the rack resistance of the house without easy access to the frame. We would have to remove internal gypsum walls or external cladding, both of which are expensive and disruptive projects. But the house has probably seem a few storms since 1941, so we’ll likely be fine in the future too.
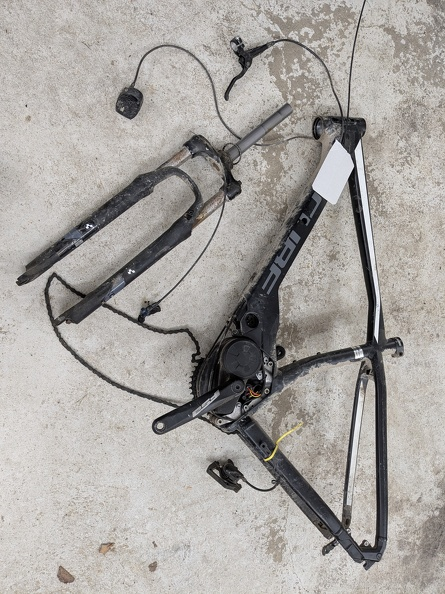
Saying Goodbye to my old Bike
Before we came to Sweden I got an ebike, in the short period when they were fairly affordable before covid and Brexit. I commuted to work on it, and the assistance meant I could travel a long way but arrive without needing a shower. It was also a big help in the first years in we moved to Sweden when I wanted to explore or my post ended up in the wrong town. Sadly the bearings in the motor have worn to the point of the cranks clunking as they move and it isn’t economic to repair.
I investigated the list of local Bosch service centres (it’s a Bosch bike motor). It was frustrating. The service centres that replied said they outsourced the work to another bike shop, which itself was silent to contact. I investigated online and realised the labour charge alone would likely be more than the value of the bike.
I could buy the motor repair kit to fit myself with the occasional special tool and research but it would still be close to £500 once delivered. Even after repairing the bike it would then be a bike with a good motor but worn out forks, headset bearings, chainset… I hate throwing away bikes but it was time to take a step back and admit it would be a money pit.
I should be able to sell the battery for a little return. The rest of the bike has gone to the metal reclamation skip at the kommune.
New Year
For new year we took a trip to Stockholm. I’ll give the visit its own page.
